Domains
By default, Tipimail sends emails through its own mutualized domains (tmrXX.com). This has the advantage to benefit from our infrastructure and to send quickly emails. Nevertheless emails will not benefit from a maximum deliverability or overall consistency of your communication.
In order to customize and secure your items, you must give us permission to send emails in your name. This article will give you more details about the advantage of using your own domain name.

Domain list
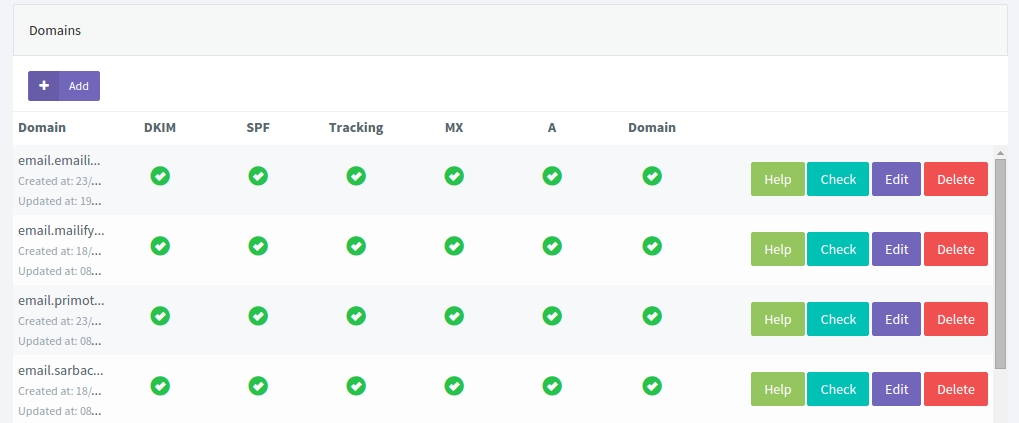
On this page, you will see a list of your sending domains. For each of your domains, you can:
- View the status of the verification of DKIM, SPF and tracking via color marks.
- Green checkmark: records are correct. You can send emails with this domain
- Red checkmark: records are incorrect. Perhaps there is an error in the recording of DNS or the DNS propagation of the modification has not yet been applied
- Question mark: registering your domain name as well as the verification of your domain are less than 48 hours. We've added this information to differentiate a bad recording to a DNS propagation records
- Force checking of DNS record by clicking on the Test button
- Edit your domain to retrieve the DNS records or modify it under domain tracking
Add a new domain
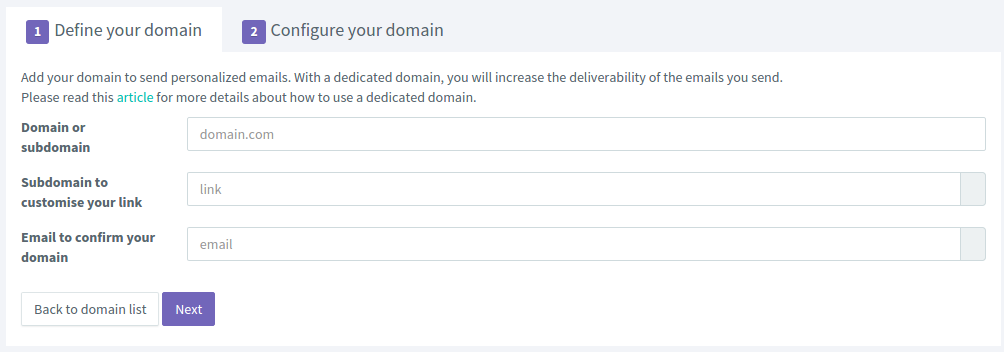
Define your domain
By clicking on the button “Add”, you will be prompted to define your domain and your tracking domain. The domain is the name used for your brand or application with the extension (.fr, .com, .net, .io, …).
The tracking domain is the domain used to customize your links. You can change the subdomain tracking used by default. We recommend using a dedicated subdomain.
Set up your domain
Once you complete the domain and tracking domain, click on the button Next to have configuration data.

SPF
SPF is used to allow our servers and more precisely our IP addresses to send emails in your name. More detail of SPF.
- At the SPF line, copy the value "spf.tipimail.com". This value is the DNS record that will add to your domain name host
- Add this value at your host at the SPF record (Tutorial available for some domain hosts).
DKIM
Le DKIM is a security using encryption to sign your email with private and public keys. More detail according the DKIM.
- At the DKIM line, copy the sub-domain and the key. This data will be necessary
- Add a new TXT record at your hoster. Complete with the sub-domain and the value as key (Guides available for some domain names web registrar)
- Click on next
Tracking domain
- Copy the name of the subdomain and the associated value
- At your domain name host, add a new CNAME record with the subdomain as a key and value as the value field (Tutorial available for some domain names to host)
MX and A fields
These fields are controlled by some ISPs. Without configuration of these fields, the deliverability of your emails will not be optimum.
Verify your domain
An email will be sent to confirm that you own the domain.
Validate your configuration
Once all operations performed, you will see several green check marks on the line of your domain. You can also control your setup by email.
- Send an email to your email address
- See the source code of the email.
- You can see the word “spf = pass” and “dkim = pass”. This certifies that your message was signed with your domain.
If instead you have red marks, please check that you have filled in your registrar.
Several guides are available for the main hosts.